HTML Basics
We won't be writing too much HTML in this class, but you'll need to know a few tags to get up and running. (HTML tags define the structure and content of your web page—we'll use them to build our page in a few moments.) Most of the time we'll be working with the Canvas tag and writing JavaScript code. That's how we'll make things interactive. The HTML page houses the Canvas tag—you open your HTML page in your browser to view an interactive project.
Create Your Web Page
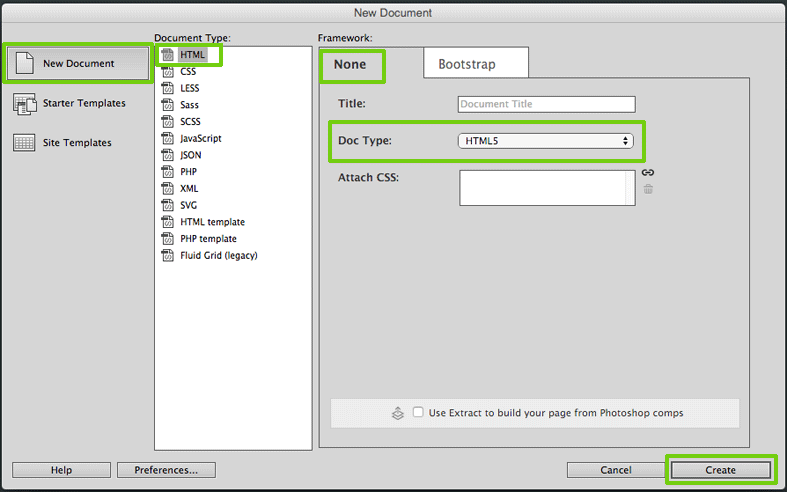
To create a basic HTML page, open Dreamweaver (don't forget to set up your site or select the site you've already created). From Dreamweaver's top menu, select File>New (Cmd + N on the mac, Ctrl + N on the PC). In the New Document panel, select the following four things: choose New Document in the left column, select HTML under the Document Type column, choose None under Framework and select HTML5 from the Doc Type drop-down menu. Press Create to build a basic HTML page.
Dreamweaver Views
Dreamweaver has three different views of your page: Code, Split, and Live. Code shows the HTML tags; Live simulates the way your page looks and acts in a browser, and Split shows both Code and Live views. You select these views by clicking on the tab-like buttons below the top menu. We'll be using Code view in this course—click on that view option.
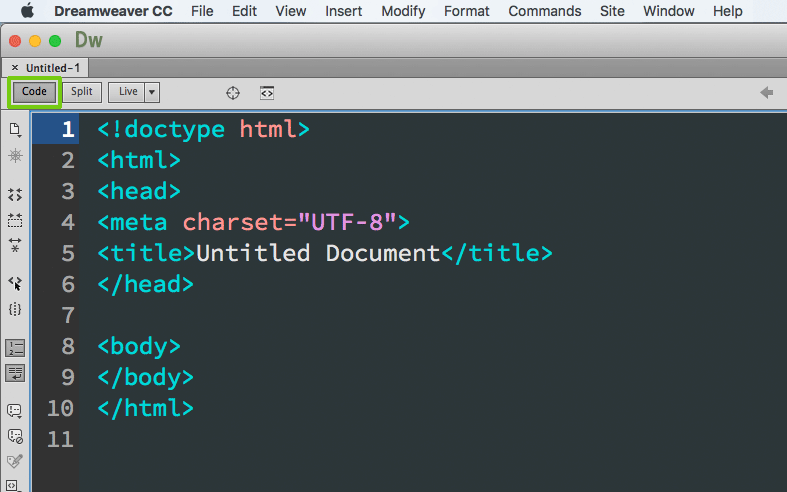
Your page's code looks like this:
<!doctype html>
<html>
<head>
<meta charset="utf-8">
<title>Untitled Document</title>
</head>

<body>
</body>
</html>
HTML Page Structure
HTML is an acronym for Hyper Text Mark-up Language—it's a language that helps you describe and organize your web page. You “mark-up” with HTML by creating tags that surround your page's content.
In our basic HTML page, the first tag, <!doctype html>, tells the browser that this is an HTML5 file. The second tag, <html> begins your HTML document. Notice that the document ends with a closing HTML tag, </html>. Many tags have opening and closing tags—both tags have the same name, the only difference between the two tags is the closing tag's forward slash (/).
You have two main sections in your HTML page. The top section is your head. Notice that this section starts with a head tag, <head> and ends with a closing head tag, </head>. Body is the other main section of your page—it starts with an opening <body> tag and ends with a closing body tag, </body>.
Head Section
The head contains information that frames your page but doesn't show up in the page. Notice the opening and closing <title> tags—the text you type between the tags shows up at the top bar of your browser and also appears in search engine results.
You can also add an opening and closing <style> tag to the head section of your page. Inside the style tag you add formatting information that affects the layout and typography of your page. (We won't add that <style> tag now but we'll use it later in the course.)
Finally the <meta> tag includes descriptions and keywords for your page. The meta tag also tells the browser how to encode characters on your page. Notice that we have one meta tag with its charset (character set) attribute set to “utf-8.” UTF is an acronym for Unicode Transformation Format which lets you encode a wide range of letters and words from around the globe in your HTML page, including words from languages that use logograms like this 毎日.
When you've finished your page, you can add meta tags to the head section to describe your page. For now, though, just give your page a title. Replace the Untitled Document text with Hello World, the name of the script we'll be writing when we finish our page.
<!doctype html>
<html>
<head>
<meta charset="utf-8">
<title>Hello World</title>
</head>

<body>
</body>
</html>
Body Section
The other main section of your page—the body section—houses the content of your page. This is the place where you add your menus, text, and media. To start working with Canvas, we're going to add two tags to the body section of our page.
<!doctype html>
<html>
<head>
<meta charset="utf-8">
<title>Hello World</title>
</head>

<body>
</body>
</html>
Canvas Tag
Next, we'll add a <canvas> tag. Canvas combined with JavaScript allows us to create graphics, animation, and interaction on our web page. Place your canvas tag just below the opening body tag:
<canvas id="myCanvas" width="1200" height="800">
You'll need a contemporary browser with javascript
turned on to be able to see this page
</canvas>
Like the other tags, the canvas tag has an opening and closing tag. It also has width and height attributes—attributes that set the canvas' size. I've set my canvas to a size of 1200 pixels by 800 pixels. You can make your canvas any size you want. A few factors that influence your size decision are composition and the screen size and processing speed of your target audience's viewing device. (I'll show you later in the course how to dynamically scale your canvas so it fits on a variety of screen sizes.)
Note the text inside the canvas' opening and closing tags—“You'll need a contemporary browser with javascript turned on to be able to see this page.” This text only shows up if someone sees your page on a browser that doesn't support HTML5 or has JavaScript turned off. Otherwise, the text is ignored and your canvas appears on the page.
Script Tag
The final tag we'll add to the body section of your page is a script tag. This script tag points to a separate JavaScript file that we'll create in the next section. Place the script tag below the canvas tag—we're going to reference the canvas tag in our JavaScript code so we need to make sure that the canvas tag is already loaded.
Add this script tag:
<script src="js/hello-world.js"></script>
Notice that the script tag has an opening and closing tag. Notice also its src (source) attribute—that attribute has a relative file path to a folder called js (remember the js folder we created inside our main folder?). Inside the js folder, we'll add a javascript file called hello-world.js. That's the file we'll create in the next section.
Your final web page code looks like this:
<!doctype html>
<html>
<head>
<meta charset="utf-8">
<title>Hello World</title>
</head>
<body>
<canvas id="myCanvas" width="1200" width="800">
You'll need a contemporary  browser with javascript
turned on to be able to see this page
</canvas>
<script src="js/hello-world.js"></script>
</body>
</html>
If you view your page in a browser, you'll see a blank page. We need to create the javascript file to add some imagery.
If you're interested in learning more about HTML and CSS, the following classes cover that material in more detail:
- Introduction to Web Design (ARTNM 401)
- Intermediate Web Design (ARTNM 402)
- Design for Tablets (ARTNM 406)