First Canvas Script
Download the code for this "Hello World" exercise
Let's create a simple script. Most coding tutoritals start with a basic program that writes out the words, "Hello World." We'll follow that tradition and update it a little for our own purposes.
Create a JavaScript File
Start up Dreamweaver, select or create your site (Site›Manage Sites or Site›New Site), and create a JavaScript file (File›New, select JavaScript from the New Document panel's Document Type column, and press Create.)
Dreamweaver adds a line of code to the top of your javascript file:
// JavaScript DocumentThis first line is a comment line—it's not part of the code that makes things happen; it's information about the code. Right now, that information is pretty generic. It's a good idea to add a few lines of comments at the top of each script to help you and others understand what the code does. Comments start with two forward slashes: //. Those slashes prevent the browser from trying to run a comment as a line of code.
Delete the default comment line and add a couple comment lines to help explain the script we're about to create:
//Hello World: My First Canvas Script
//A simple script that prints "Hello World" to the screen,
//draws a square, and writes to the Console panel.
With a few comments in place, we're ready to start coding.
Access Canvas and Create a Context
We need to access the canvas tag and then set up a graphics context—the layer where we draw everything. At the top of your page, type in these two lines:
var canvas = document.getElementById('myCanvas');
var context = canvas.getContext('2d');
Variables
We've just created two variables. Think of a variable as a container that holds a value; it's called a variable because its value can vary over time. Our variables in this example will keep their initial values throughout the whole script.
To create a variable in JavaScript, type the keyword var and then type a variable name. Try to make your variable names descriptive and succinct. Start with a letter and avoid special characters, including hyphens. (Use hyphens for multi-word html, CSS, and JavaScript files but don't use them for multi-word variables inside JavaScript—JavaScript is capable of arithmetic functions and a hyphen can be interpreted as a subtraction sign.) If you need a multi-word variable name, the convention is to use camel case letters—all lower case letters except for the first letter of the second and subsequent words. For example, a variable that stores a first name could be typed in camel case like this: firstName.
You assign a value to a variable with an equal sign. The variable name is on the left side of the equal sign; the value is on the right side.
var firstName = 'Ishii';
Methods
var canvas = document.getElementById('myCanvas');
var context = canvas.getContext('2d');
Our first variable—canvas—gets access to the canvas tag in our HTML document. When we created our canvas tag we gave it an id of myCanvas. We're using that id to access the canvas tag. document is the HTML document object which has a method called getElementById. Methods let you do something—in this case, the document's method gives us access to any element in the HTML page that has an id attribute. You often pass arguments (pieces of data) to a method. Here we're passing the id as a single argument.
Notice the syntax of our call to the getElementById method. We first reference the object that houses the method—document—place a period after that object and write the method named—getElementById. The opening and closing parentheses are part of the method; you place your argument—the id of myCanvas—in between those parentheses. Don't forget to finish with a semicolon that tells JavaScript your line of code is complete. Also, notice that our argument 'myCanvas' has single quotes surrounding it. That tells JavaScript that our argument is a string, a data type that stores characters. Strings are surrounded by single or double quotes. Learn more about datatypes.
Graphic Context
var canvas = document.getElementById('myCanvas');
var context = canvas.getContext('2d');
Our second variable, context, calls a method on the canvas object. This method creates a graphical context—the object we'll use to create graphics and write text. Notice that the syntax is similar to our previous line of code: object.method(arguments);
var context = canvas.getContext('2d');Context stores a value of the canvas' drawing surface by calling the getContext method on the canvas object and passing an argument of '2d'.
You'll use these two lines of code in every script you write for Canvas. You're accessing the canvas tag and setting up a graphical context.
Draw Text and Shape
Now let's draw some text and add a shape to our context.
Add three more lines of code:
context.font = "2em sans-serif";
context.fillText("Hello World", canvas.width/2, canvas.height/3);
context.fillRect(canvas.width/2, canvas.height/2, 100, 100);
Context has a lot of methods that draw things. We're using two of them: fillText() and fillRect(). As you might guess, fillText draws text on the context and fillRect draws a rectangle or square.
Properties
Before we write any text, we set context's font property. A property is like a variable attached to an object. Context's font property determines the font of the text. I'm setting the fonts size (2 em) and the font family (a generic sans-serif font).
fillText and fillRect Methods
Now let's look at the two methods, fillText() and fillRect(). Both methods take several arguments. fillText()'s first argument is the text you want to draw to the screen. Our text is "Hello World." The next two arguments set the X and Y positions of our text. We set the dimensions of our canvas in our html code (<canvas id='myCanvas' width='1200' height='800'></canvas>) and when we access the canvas object we also have access to the canvas object's width and height properties. Our argument for the X position performs a calculation on canvas' width property—we divide it by two. Since our canvas is 1200 pixels, our “Hello World” is placed at an X position of 600 (1200/2 = 600). Our last argument performs a calculation on the the canvas' height: canvas.height/3. That means our text's Y position will be 800 divided by 3 or 200 pixels.
Notice that each argument is separated by a comma.
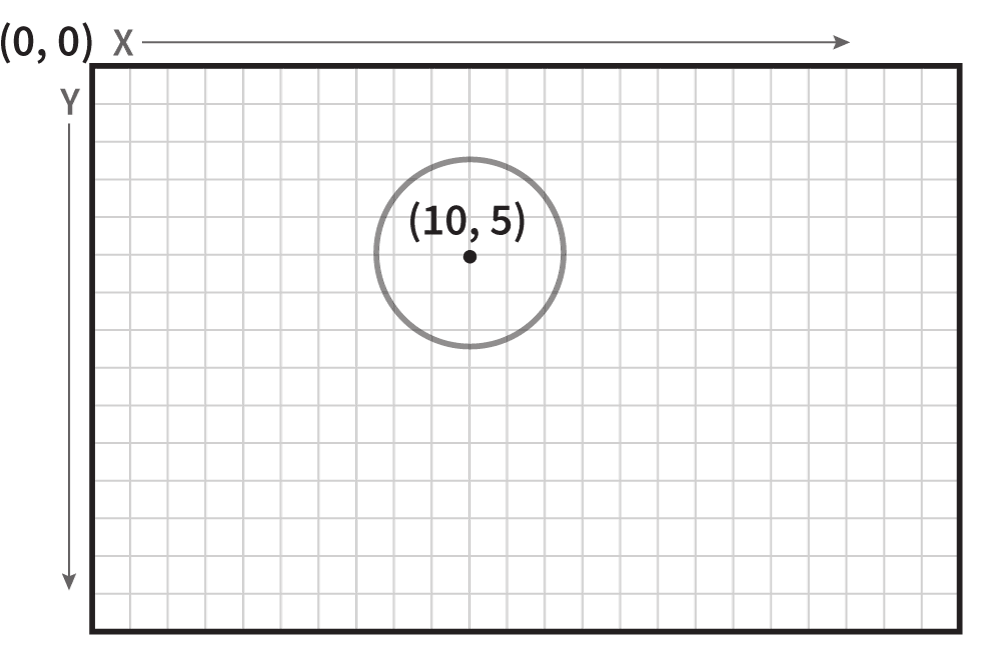
Screen Coordinates
You may be wondering how X and Y coordinates are managed by canvas. When you work in two-dimensions (X and Y) on the screen, the convention is to make the upper-left corner of your screen (0, 0)—X is 0 and Y is 0. As you move across your screen, X increases; as you move down your screen Y increases. It's a lot like the X and Y graphs you drew in math class except Y is flipped—that is, Y increases in value as you move down.
Draw a Shape
Our next method, fillRect creates a rectangular shape. We pass four arguments to this method: the rectangle's X and Y position followed by its Width and Height. I'm using the canvas properties of width and height to place the shape again—the only difference is that this time I'm dividing canvas.height by two instead of three (800/2=400) so that the shape is placed below the text. And I've passed 100 pixels as my width and height arguments—that means we're drawing a square since both all sides are 100 pixels.
Logging Messages to the Console Panel
We're going to add one more line of code. This code won't draw anything to our canvas' context but it will write text to our browser's Console panel. The Console panel helps you debug your code. You send messages to the Console and print out variable values. If you're just surfing the web, you'll probably never see the Console panel. You open the Console by going to the browser's menu and selecting Developer tools. In Chrome this option is under the top right menu, More Tools>Developer Tools and click on the Console tab (if you don't see the Console tab, click on the double arrows button and select Console from the drop-down menu). In Firefox, click on the top right menu, select Developer, and then select Web Console. In Safari, select Preferences>Advanced and click on “Show Developer menu in the menu bar” at the bottom of the Advanced window. Develop now appears in the menu bar—click Develop and select Show Error Console.
When you select Developer Tools, several panels show up in your browser. Look for a tab called Console and click on it. The browser writes error messages to the Console and you can write messages there as well. I use the Console to debug any code I write. You'll soon see it as a very useful tool.
To write yourself a message in the Console panel, type:
console.log('Hello Again '+ canvas.width + ' ' + canvas.height);The syntax should look familiar by now. We target the console object and run its log method. Inside the log methods parentheses, we pass an argument. Our argument here is a mix of strings and properties. We concatenate them—add one after the other—using the plus sign. The first part of our message is a string, 'Hello Console World' (remember that strings are surrounded with single or double quotes). Next we add the canvas width property. The browser prints out the property's value—which is 1200. This is the power of console.log()—you can see the current value of your variables. After the canvas width property, I add a blank space (another string, just a blank space surrounded by quotes), and then add the canvas height. The blank space puts a gap between the width and height properties so we can read the number values more easily.
Sweat the Small Stuff
When you're coding, it's important to pay attention to the details. Leave off a semicolon or put a quote in the wrong place and things won't work. Computers require precision. With that said, I recommend that you type in the code for each tutorial rather than copy and paste the code. You'll learn more through the process of line-by-line typing; at the very least you'll become familiar with JavasScript syntax. Don't get frustrated when something doesn't work the first time—that's pretty typical of the way things go. Take a deep breath, look over your code, compare it to the tutorial code, check for error messages in your browser's Console panel, and try again.
Here's the complete code for this first Canvas script.
//Hello World: My First Canvas Script
//A simple script that prints "Hello World" to the screen,
//draws a square, and writes to the Console panel.
var canvas = document.getElementById('myCanvas');
var context = canvas.getContext('2d');
context.font = '2em sans-serif';
context.fillText('Hello World', canvas.width/2, canvas.height/3);
context.fillRect(canvas.width/2, canvas.height/2, 100, 100);
console.log('Hello Again ' + canvas.width + ' ' + canvas.height);
That's it for our Hello World code. Save your JavaScript file and go back to your HTML page. Verify that the script tag below your canvas tag has a src attribute that points to the JavaScript file you just created. Launch your favorite browser and then open the HTML file you just created. (You can open an HTML file in a browser by pressing Cmd + o on a mac or Ctrl + o on a PC and then navigating to your HTML file.)
With your HTML page loaded in your browser, do you see your text with a square shape below it? Open your browser's Console panel. Do you see the message you wrote?
In our next exercise, we'll learn how to draw more shapes to the Canvas.