Make the Circle Clickable
Download the code for Change Colors
In our last exercise, we created a circle that changes color with every click, but what if we wanted to change the color only if we clicked inside the circle? Right now we change colors when we click anywhere inside the canvas. How can we make only the circle clickable?
Mousemove Event
First we track the mouse movement inside canvas by adding a second event and a second function. The second event looks like this:
canvas.addEventListener('mousemove', checkMouseMovement);We're using the addEventListener() method again. This time we pass the predefined event string 'mousemove' and link the event to a new function called checkMouseMovement. Now checkMouseMovement is called with each change in the mouse's position over the canvas.
The new code looks like this:
//Change Colors
//Click on the circle to change its color
(function() {
  "use strict";
  var canvas = document.getElementById('myCanvas'),
  context = canvas.getContext('2d'),
  canvasW = canvas.width,
  canvasH = canvas.height,
  circX = canvasW/2,
  circY = canvasH/2,
  radius = 200,
  startRad = 0,
  endRad = Math.PI *2,
  mouseOverCircle = false,
  RED_MAX = 255,
  GREEN_MAX = 255,
  BLUE_MAX = 255,
  //Make your canvas responsive to the browser's window size
  myRC = new ResponsiveCanvas({canvasId:'myCanvas', divId:'interaction'});
  //resize the canvas
  myRC.resizeCanvas();

  //draw your circle
  context.fillStyle = 'rgb(0,0,0,)';
  context.beginPath();
  context.arc(circX, circY, radius, startRad, endRad);
  context.fill();

  //listen for mousedown and mousemove events
  canvas.addEventListener('mousedown', changeColor);
  canvas.addEventListener('mousemove', checkMouseMovement);

  //give the circle a new color
  function changeColor() {
	if (mouseOverCircle) {
	  context.clearRect(0, 0, canvasW, canvasH);
	  context.fillStyle = 'rgb(' + Math.floor(Math.random() * RED_MAX) +',' + Math.floor(Math.random() * GREEN_MAX) + ',' + Math.floor(Math.random() * BLUE_MAX) + ')';
	  context.beginPath();
	  context.arc(circX, circY, radius, startRad, endRad);
	  context.fill();
	}
  }

})();
Another Function
Let's turn our attention to the checkMouseMovement function. Remember that our goal is to make only the circle clickable. To do that, we'll use a little geometry. Do you remember Pythagorus' theorem from your mathematics classes? When you learned the theorem, did you ever think, “when will I ever use this”? Guess what. You finally get to use that theorem!
Just a quick refresher. Pythagoras' theorem states that the square of a right triangle's hypotenuse is equal to the square of the triangle's other two sides added together. Looking at the graphic below, a formula for this theorem would be:
c * c = (a * a) + (b * b)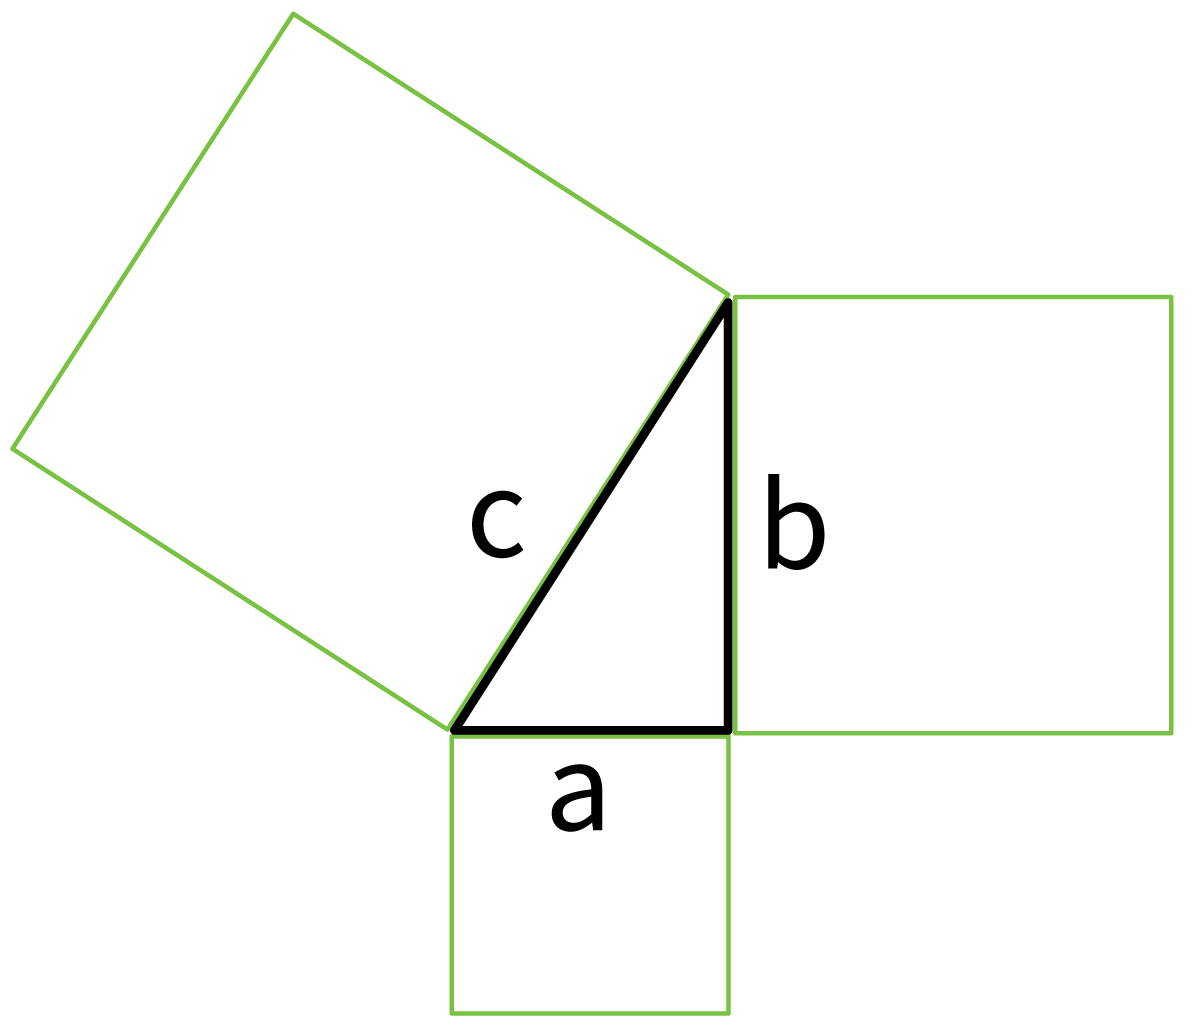
Now you might be thinking, “wait a minute, we're working with a circle not a triangle.” That's true, but if you think of the distance between the mouse's position and the circle's center point as the hypotenuse of a triangle, you'll see right triangles all over the place. Roll your mouse over the circle below to see those triangles.
We can use Pythagoras' theorem to determine if the mouse if currently inside or outside the circle's perimeter. We calculate the distance between the mouse's position and the circle's center point (our imaginary right-triangle's hypotenuse) by subtracting the circle's X position from the mouse's X position and the circle's Y position from the mouse's Y position. We now have essentially the length of the our imaginary right-triangle's shorter sides. Now all we need to do is follow our formula derived from Pythagoras' theorem.
Let's run through a specific example. Imagine our circle's center point is (500, 500); it's 500 across and 500 pixels down from our Canvas' top left corner. Let's say our circle has a radius of 100 pixels. If we move our mouse to an x position of 600 and a y position of 400, we can determine if the mouse is within the circle's perimeter by first calculating our imaginary right-triangle's two smaller sides (the sides that are not the hypotenuse).

Side one is calculated by subtracting the mouse's X position from the circle's center point X: 600-500 = 100. We calculate the other side by subtracting the mouse's Y position from the circle's center Y point: 400-500 = -100. (Don't worry that we have a negative number, we're about to multiply each side's length by itself and two negative numbers become a positive number.)
Let's calculate our imaginary right-triangle's hypotenuse using Pythagoras' theorem. Here's our equation:
hypotenuse = square root of (100 * 100) + (-100 * -100) = 141.42Now all we need to do is compare our hypotenuse to our circle's radius. If the hypotenuse is less than or equal to the radius, then we're inside the circle's perimeter; if our hypotenuse is larger than the radius, then we're outside the circle. Since our radius is 100 pixels and the hypotenuse is a little more than 141 pixels, we're outside the circle.
Back to our checkMouseMovement function. The function simply checks, using Pythagoras' theorem, if the mouse is inside or outside the circle and set's a variable, mouseOverCircle, to either true (if we're inside the circle) or false (if we're outside the circle). We then modify our changeColor function so that it check's the variable mouseOverCircle and only updates the color if mouseOverCircle is true—meaning the mouse was clicked when it was within the circle's perimeter. If we click any place outside the circle, the circle's color doesn't change.
Here are the code changes to changeColor and the logic for checkMouseMovement:
function changeColor() {
	if (mouseOverCircle) {
	  context.clearRect(0, 0, canvasW, canvasH);
	  context.fillStyle = 'rgb(' + Math.floor(Math.random() * RED_MAX) +',' + Math.floor(Math.random() * GREEN_MAX) + ',' + Math.floor(Math.random() * BLUE_MAX) + ')';
	  context.beginPath();
	  context.arc(circX, circY, radius, startRad, endRad);
	  context.fill();
	}
  }

  function checkMouseMovement(e) {
	var sideA, sideB, hypotenuse;

	sideA = circX - e.clientX;
	sideB = circY - e.clientY;
	hypotenuse = Math.sqrt((sideA * sideA) + (sideB * sideB));

	if (hypotenuse <= radius) {
	  canvas.style.cursor = 'pointer';
	  mouseOverCircle = true;
	} else {
	  canvas.style.cursor = 'auto';
	  mouseOverCircle = false;
	}
  }
Notice the e parameter inside the parentheses of our checkMouseMovement function. Recall that checkMouseMovement is called with each mousemove event. When we capture a mousemove event, we're sent an event object with useful properties attached to it. Two of those properties are the mouse's current X and Y position—those event object properties are called clientX and clientY.
In our code we calculate the length of our imaginary right-triangle's shorter sides by subtracting circX (our circle's center X point) from e.clientX (the mouse's X position) and subtracting circY (our circle's center Y point) from e.clientY (the mouse's Y position). When we do that, we know the length of two sides of the triangle. We take length of those sides and calculate the hypotenuse using Math's sqrt() (square root) method to which we pass the sum of the triangle's two sides squared. Here are those calculations in code:
  sideA = circX - e.clientX;
  sideB = circY - e.clientY;
  hypotenuse = Math.sqrt((sideA * sideA) + (sideB * sideB));
Now we check the hypotenuse against the circle's radius. If the hypotenuse is longer than the radius, we're outside the circle; smaller than or equal to the radius, then we're inside the circle. Inside each conditional statements, we set the mouseOverCircle variable to either true or false; true if inside the circle, false if outside the circle.
if (hypotenuse <= radius) {
  canvas.style.cursor = 'pointer';
  mouseOverCircle = true;
} else {
  canvas.style.cursor = 'auto';
  mouseOverCircle = false;
}
You'll need to add a mouseOverCircle variable to the top of your script—initialize it to false.
//Change Colors
//Click on the circle to change its color
(function() {
  "use strict";
  var canvas = document.getElementById('myCanvas'),
  context = canvas.getContext('2d'),
  canvasW = canvas.width,
  canvasH = canvas.height,
  circX = canvasW/2,
  circY = canvasH/2,
  radius = 200,
  startRad = 0,
  endRad = Math.PI *2,
  mouseOverCircle = false,
  RED_MAX = 255,
  GREEN_MAX = 255,
  BLUE_MAX = 255,
  //Make your canvas responsive to the browser's window size
  myRC = new ResponsiveCanvas({canvasId:'myCanvas', divId:'interaction'});
  //resize the canvas
  myRC.resizeCanvas();
  .
  .
  .
Look back at the if-else statement at the end of checkMouseMovement. When we check our hypotenuse against our circle's radius, we also change the canvas' cursor icon. If we're over the circle, we set the cursor to a pointing finger to indicate that the circle is clickable. If we're outside the circle, we change the cursor back to it's default, an arrow icon. Changing the cursor helps the user understand the capabilities of an element on your page. Of course, this only works if you're viewing the canvas page on a desktop. If you're on a tablet or a mobile phone with a touch-screen, you don't have a cursor icon. (So on mobile apps, you often need to take extra care to make the clickable things on your screen look like they're clickable—you don't have the secondary indicator of a cursor icon.)
Notice the structure and syntax of an if-else conditional statement. Your if condition is surrounded by parentheses; if that condition is true, the code inside curly brackets runs. The code within the else section of your if-else conditional statement runs when your top condition is not true. Just like the if statement, the else statement code is surrounded by curly brackets.
Update changeColor Function
Don't forget to update the changeColor function with a conditional statement that checks the mouseOverCircle variable. mouseOverCircle is a boolean variable—it can be either true or false. A conditional check of a boolean variable works like this:
if (myBooleanVariable) {
  //the boolean variable is true,
  //run code within the curly brackets

} else {
  //the boolean variable is false,
  //run code within the curly brackets

}
This is what our new changeColor function looks like:
function changeColor() {
  if (mouseOverCircle) {
    context.clearRect(0, 0, canvasW, canvasH);
    context.fillStyle = 'rgb(' + Math.floor(Math.random() * RED_MAX) +',' + Math.floor(Math.random() * GREEN_MAX) + ',' + Math.floor(Math.random() * BLUE_MAX) + ')';
    context.beginPath();
    context.arc(circX, circY, radius, startRad, endRad);
    context.fill();
  }
}
We have a single if condition that checks our mouseOverCircle boolean. If mouseOverCircle is true, then we change the circle's color. Otherwise, nothing happens and the circle's color remains the same. Don't forget we set mouseOverCircle in the checkMouseMovement function which is called whenever the mouse is moving around the screen.
Save your JavaScript file and open your HTML page in a browser. Try to view your canvas so it's close to its 1200x800 pixel size. Click on the circle and see if it changes color?
What happens if you scale your canvas by enlarging or shrinking your browser window? Does everything work as expected?
Convert Mouse Position to Canvas Position
You might have noticed, particularly if you're looking at your HTML page on a low-resolution screeen that you can't click on the circle. Or if you have wide margins on either side of your canvas, that your clickable area isn't quite right. What's happening here?
Event Object's Mouse Position
We need to adjust the mouse position that we receive from the mousemove event object. (Remember the e parameter in checkMouseMovement that houses mouse X and Y position properties?) The browser sends us an event object with the mouse X and Y position for the entire web page. We need the mouse X and Y position for just our Canvas.
For example, imagine we have a web page where the Canvas has 100 pixel margins on either side of it and 100 pixel margin at its top. If you place your mouse at a position that's 200 x and 200 y on the canvas, the mouse position for the web page is 300 x and 300 y. It's that second mouse position—the position on the whole web page—that you receive from the event object passed with a mousemove event. We need to convert that mouse position so it corresponds the mouse position we're expecting for our Canvas.
Find Out the Canvas' Position on Your Page
To be able to convert the browser window's mouse position to the Canvas' mouse position, we need to first find out where the Canvas is positioned on our page. We can do that with a method called getBoundingClientRect(). When you run this method on an element on your page, it tells you the size and position of your element.
Let's make a new function where we'll run the getBoundingClientRect method on our Canvas and calculate the correct mouse position for our script. Create a new function called convertPositionToCanvas and invoke the getBoundingClientRect method. Here's the beginning of our function:
function convertPositionToCanvas(x, y) {
  canvasBox, canvasX, canvasY;
  canvasBox = canvas.getBoundingClientRect();

}
Look at the two parameters—x and y—inside the parentheses right after convertPositionToCanvas. This means we're passing into the function the x and y position we receive from the event object and we'll reference those positional values with x and y inside our function's code.
Our first line of code in the function defines the local variables we plan to use. The next line of code calls the getBoundingClientRect which returns to us an object with properties. We'll use four of those properties: left, top, width, and height. The left and top tell us the position of the canvas' top left corner; the width and height tell us its current size. We save the returned object in a variable called canvasBox and we'll reference its properities when we calculate the canvas' mouse position.
Just below the first two lines of code inside convertPositionToCanvas, add these lines of code:
canvasX = x – canvasBox.left;
canvasY = y - canvasBox.top;
(Notice the dot-notation syntax: we reference a property on an object by first stating the object's name, in this case canvasBox, and then follow that object name with a period and a property name, .left or .top . We call it dot notation because each property or method tied to an object is prefixed with a period, also called a dot.)
Remember our example where we had a margin of 100 pixels to the left of the Canvas and top margin also of 100 pixels. In this example, canvasBox.left would have a value of 100 and canvasBox.top would also have a value of 100. If we moved the mouse position to 200 x and 200 y on the Canvas, our web-page mouse would be 300 x and 300 y, and that's the value that we get from the event object. So the variables in the code above would have the following values:
canvasX = 300 – 100;
canvasY = 300 – 100;
You can see by subtracting canvasBox.left and canvasBox.top from our mouse position, we end up with a mouse position that's accurate for our Canvas.
Convert Scaling Canvas
We have one more piece of our conversion calculation that we need to add before we're done. Now that we've made our canvas more responsive, its size changes in sync with changes in the browser window. When you view our previous version of the code in a very small browser window and try to click on the circle, its very likely that the circle didn't change color. That's because the mouse position we receive from the event object would be very small—if our canvas was 300 by 200 pixels, for example, our mouse x position would never be greater than 300 and our y would never be greater than 200, yet our circle is positioned in the code at 600 x and 400 y. At the small size, the mouse would never click at a position that would be caught by our logic in our checkMouseMovements and changColor functions.
Then, we need to covert the mouse position not only based on the margin surrounding the canvas but also on the current canvas size. We do that by multiplying our last converted number by the original canvas size divided by the current canvas size. Our new calculation looks like this:
canvasX = (x - canvasBox.left) * (canvasW/canvasBox.width);
canvasY = (y - canvasBox.top) * (canvasH/canvasBox.height);
Let's think a little about this calculation. Notice first that we put parts of our calculation in parentheses—JavaScript runs the calculations inside parentheses first and then continues with the rest of the calculation. The parentheses in the calculation here means we first subtract the margin from the mouse position, then divide the original canvas size by the current canvas size, and only after we've done those two calculations do we multiply the results together. JavaScript, like many other computer languages, prioritizes arithmetic operators—multiplication and division are performed before addition and subtraction. When operators are at the same priority like multiplication and division, the operator's position in the calculation takes priority—operators on the left take precedence over those on the right.
For some calculations you can rely on JavaScript's arithmetic priorities. If we did that in this calculation, though, we end up with the wrong number. We'd multiply the margin by the original canvas size then divide that number by the current canvas size and finally subtract that number from the mouse's position. That's a very different calculation than the one we want. Adding parentheses helps set the order of operators and often makes our code easier to read; some times, even if you can rely on arithmetic priorities, we add parentheses anyway just to clarify our calculation.
Finally, we need to return that newly converted x and y positions. We do that like this:
return {x: canvasX, y: canvasY};We're returning an object literal. Object literals wrap up property names and values inside curly brackets—they let you put a mix of data in one package. The syntax works like this: start with a left-facing curly bracket, add a property followed by a colon, then add the property's value followed by a comma, close off your object literal with right-facing curly bracket. In our object literal, we have two properties called x and y with values of canvasX and canvasY, the converted mouse position.
The full function looks like this:
function convertPositionToCanvas(x, y) {
  var canvasBox, canvasX, canvasY;
  canvasBox = canvas.getBoundingClientRect();
  canvasX = (x - canvasBox.left) * (canvasW/canvasBox.width);
  canvasY = (y - canvasBox.top) * (canvasH/canvasBox.height);
  return {x: canvasX, y: canvasY};
}
We need to add one last thing to get our script up and running. Head back to the checkMouseMovement function—that's the place where we get the event object's mouse position. Inside this function, add a new variable called mousePosition. Then below the variables, set your new variable, mousePosition, equal to the convertPositionToCanvas() function and pass along the event object's mouse x and y position. The code so far would look like this:
function checkMouseMovement(e) {
  var mousePostion, xsideA, sideB, hypotenuse;

  mousePosition = convertPositionToCanvas(e.clientX, e.clientY);
.
.
.
}
Our mousePosition variable stores the object literal that contains the converted x and y positions from convertToPositionCanvas(). Next we'll modify the code a little to include the converted mouse position by changing the two lines that set sideA and sideB variables. Instead of subtracting the event object's position from the circle's center point, we'll subtrat the converted mouse position from the center point.
sideA = circX - mousePosition.x;
sideB = circY - mousePosition.y;
The final checkMouseMovement function looks like this:
function checkMouseMovement(e) {
	var mousePostion, sideA, sideB, hypotenuse;

	mousePosition = convertPositionToCanvas(e.clientX, e.clientY);
	sideA = circX - mousePosition.x;
	sideB = circY - mousePosition.y;
	hypotenuse = Math.sqrt((sideA * sideA) + (sideB * sideB));

	if (hypotenuse <= radius) {
		canvas.style.cursor = 'pointer';
		mouseOverCircle = true;
	} else {
		canvas.style.cursor = 'auto';
		mouseOverCircle = false;
	}
}
Here's all the code for change-color.js:
//Change Colors
//Click on the circle to change its color
(function() {
  "use strict";
  var canvas = document.getElementById('myCanvas'),
  context = canvas.getContext('2d'),
  canvasW = canvas.width,
  canvasH = canvas.height,
  circX = canvasW/2,
  circY = canvasH/2,
  radius = 200,
  startRad = 0,
  endRad = Math.PI * 2,
  mouseOverCircle = false,
  RED_MAX = 255,
  GREEN_MAX = 255,
  BLUE_MAX = 255,
  //Make your canvas responsive to the browser's window size
  myRC = new ResponsiveCanvas({canvasId:'myCanvas', divId:'interaction'});
  //resize the canvas
  myRC.resizeCanvas();

  //draw your circle
  context.fillStyle = 'rgb(0,0,0,)';
  context.beginPath();
  context.arc(circX, circY, radius, startRad, endRad);
  context.fill();

  //listen for mousedown and mousemove events
  canvas.addEventListener('mousedown', changeColor); //call changeColor when a mousedown event occurs
  canvas.addEventListener('mousemove', checkMouseMovement); //call checkMouseMovement when a mousemove event occurs

  //give the circle a new color
  function changeColor() {
	if (mouseOverCircle) {
	  context.clearRect(0, 0, canvasW, canvasH);
	  context.fillStyle = 'rgb(' + Math.floor(Math.random() * RED_MAX) +',' + Math.floor(Math.random() * GREEN_MAX) + ',' + Math.floor(Math.random() * BLUE_MAX) + ')';
	  context.beginPath();
	  context.arc(circX, circY, radius, startRad, endRad);
	  context.fill();
	}
  }

  //see if the mouse if over the circle
  function checkMouseMovement(e) {
	var mousePosition, sideA, sideB, hypotenuse;
	mousePosition = convertPositionToCanvas(e.clientX, e.clientY);
	sideA = circX - mousePosition.x;
	sideB = circY - mousePosition.y;
	hypotenuse = Math.sqrt((sideA * sideA) + (sideB * sideB));

	if (hypotenuse <= radius) {
	  canvas.style.cursor = 'pointer';
	  mouseOverCircle = true;
	} else {
	  canvas.style.cursor = 'auto';
	  mouseOverCircle = false;
	}
  }

  //convert the window's mouse position to the canvas' mouse position,
  //modifying that position based on the canvas' current scale and position on the web page
   function convertPositionToCanvas(x, y) {
	var canvasBox, canvasX, canvasY;
	canvasBox = canvas.getBoundingClientRect();
	canvasX = (x - canvasBox.left) * (canvasW/canvasBox.width);
	canvasY = (y - canvasBox.top) * (canvasH/canvasBox.height);
	return {x: canvasX, y: canvasY};
  }

})();
A Question to Think About
Once in a while, when you click the circle, it disappears? Why does that happen? How could you stop that from happening?